Earlier we’ve seen how we can create polygons with labels, create editable polygons, and highlight polygons on hover in Google Maps JavaScript API v3 using Vue.js. Today we’ll see how we can remove polygons on click on Google Maps.
We’re going to use sets of data to draw our polygons. We’re then going to store the data in a reactive state with some ids. Please keep in mind that we cannot remove a polygon set just by filtering the index position from the polygons set. This is because after we remove a polygon from somewhere between the set, the indexes are updated but the references are not.
That means if we had three polygons named A, B, and C. When we remove a polygon from position 2 (index 1), polygon C now gets index 1. When we add event listeners to polygons, we may bind the listeners with the index, and the new index is no more updated after one is removed. To solve this issue, we can map the indexes of the polygons with another set containing ids.
But the problem with that approach would be even worse. We would have to bind the data two-way. That is, update the index with new ids when a polygon is removed or remove the id from the set whenever an index is updated without an id.
Example
A better approach is to have ids for each of the data sets. Here’s what my polygonsets.js looks like:
export const polygonCoordsSetData = [
  {
    id: 0,
    coords: [
      { lat: 29.1326328, lng: 75.4326439 },
      { lat: 28.6034753, lng: 74.9931908 },
      { lat: 28.2217897, lng: 75.6139183 },
      { lat: 28.6757916, lng: 76.1412621 },
      { lat: 29.1230358, lng: 75.4546165 },
      { lat: 29.1326328, lng: 75.4326439 }
    ]
  },
  {
    id: 1,
    coords: [
      { lat: 29.6208854, lng: 76.1317668 },
      { lat: 29.6352102, lng: 77.1872408 },
      { lat: 28.7817652, lng: 77.3631531 },
      { lat: 28.680272, lng: 76.9314777 },
      { lat: 29.6205496, lng: 76.1288777 },
      { lat: 29.6208854, lng: 76.1317668 }
    ]
  },
  {
    id: 2,
    coords: [
      { lat: 28.4267317, lng: 77.1130229 },
      { lat: 27.7385421, lng: 75.9915818 },
      { lat: 27.4854309, lng: 76.882138 },
      { lat: 27.6509929, lng: 77.17899 },
      { lat: 28.4267317, lng: 77.1130229 }
    ]
  }
];

Code language: JavaScript (javascript)
You’d notice that for each of the coordinates set, we’ve allocated an id along with coordinates. We can now import the data into our Polygons component as follows:
<template>
  <div>
    <div class="header-margins">
      <h3>Remove polygons on click (Google Maps)</h3>
      <div class="np-polygon-length">
        Total polygons: {{ polygonsDataSetMutable.length }}
      </div>

      <div
        v-for="(polygonData, pIndex) in polygonsDataSetMutable"
        :key="pIndex"
      >
        <div class="np-polygon-data">
          <div>id: {{ polygonData.id }}</div>
          <div>
            coords:
            {{ polygonData.coords }}
          </div>
        </div>
      </div>
    </div>
    <div id="polygon-label-map" class="map-margins"></div>
    <small>www.nightprogrammer.com</small>
  </div>
</template>

<script>
import loadGoogleMapsApi from "load-google-maps-api";
import { gMapsApiKey } from "./../constants";
import { polygonCoordsSetData } from "./polygonsets";

export default {
  name: "Polygons",
  data() {
    return {
      map: null,
      polygonsDataSetMutable: polygonCoordsSetData,
      polygonShapes: [],
    };
  },
  mounted() {
    loadGoogleMapsApi({
      key: gMapsApiKey,
      libraries: ["places", "drawing", "geometry"],
    }).then(() => {
      const mapZoom = 12;
      const { google } = window;
      const mapOptions = {
        zoom: mapZoom,
        mapTypeId: google.maps.MapTypeId.HYBRID,
        center: new google.maps.LatLng({ lat: 28.680272, lng: 76.5314777 }),
        mapTypeControl: true,
        streetViewControl: false,
        mapTypeControlOptions: {
          position: google.maps.ControlPosition.BOTTOM_LEFT,
        },
      };
      this.map = new google.maps.Map(
        document.getElementById("polygon-label-map"),
        mapOptions
      );

      const polygonCoordsSet = this.polygonsDataSetMutable;

      const tempBounds = new google.maps.LatLngBounds();

      for (let i = 0; i < polygonCoordsSet.length; i++) {
        polygonCoordsSet[i].coords.forEach((coord) => {
          const BoundLatLng = new google.maps.LatLng({
            lat: parseFloat(coord.lat),
            lng: parseFloat(coord.lng),
          });
          tempBounds.extend(BoundLatLng);
        });
      }

      this.polygonShapes = [];
      const fillColors = ["#ff0000", "#00ff00", "#00ff00"];

      for (let i = 0; i < polygonCoordsSet.length; i++) {
        const polygonShapeContructor = new google.maps.Polygon({
          paths: polygonCoordsSet[i].coords,
          strokeColor: "#ffffff",
          map: this.map,
          strokeWeight: 3,
          fillColor: fillColors[i],
          fillOpacity: 0.2,
          zIndex: 99999,
        });

        this.polygonShapes.push({
          id: i,
          polygon: polygonShapeContructor,
        });

        this.polygonShapes.forEach((polygonShape, i) => {
          google.maps.event.addListener(polygonShape.polygon, "click", () => {
            polygonShape.polygon.setMap(null);
            this.polygonsDataSetMutable = this.polygonsDataSetMutable.filter(
              (pData, pIndex) => pData.id !== polygonShape.id
            );
          });
        });
        this.map.setZoom(7);
      }
    });
  },
};
</script>
Code language: HTML, XML (xml)
Line 30: We’ve imported the polygons data from the polygonsets.js file. You can of course get the data from a remote response as well.
Line 37: We stored the data in a reactive state called polygonsDataSetMutable. We’re keeping it reactive so that we can remove sets from this list when we remove some polygons.
Line 81: We’ve created polygons for each of the polygonCoordsSet[i].coords coordinates.
Line 91-94: We’re pushing the created polygons along with some index i which would work as ids while removing.
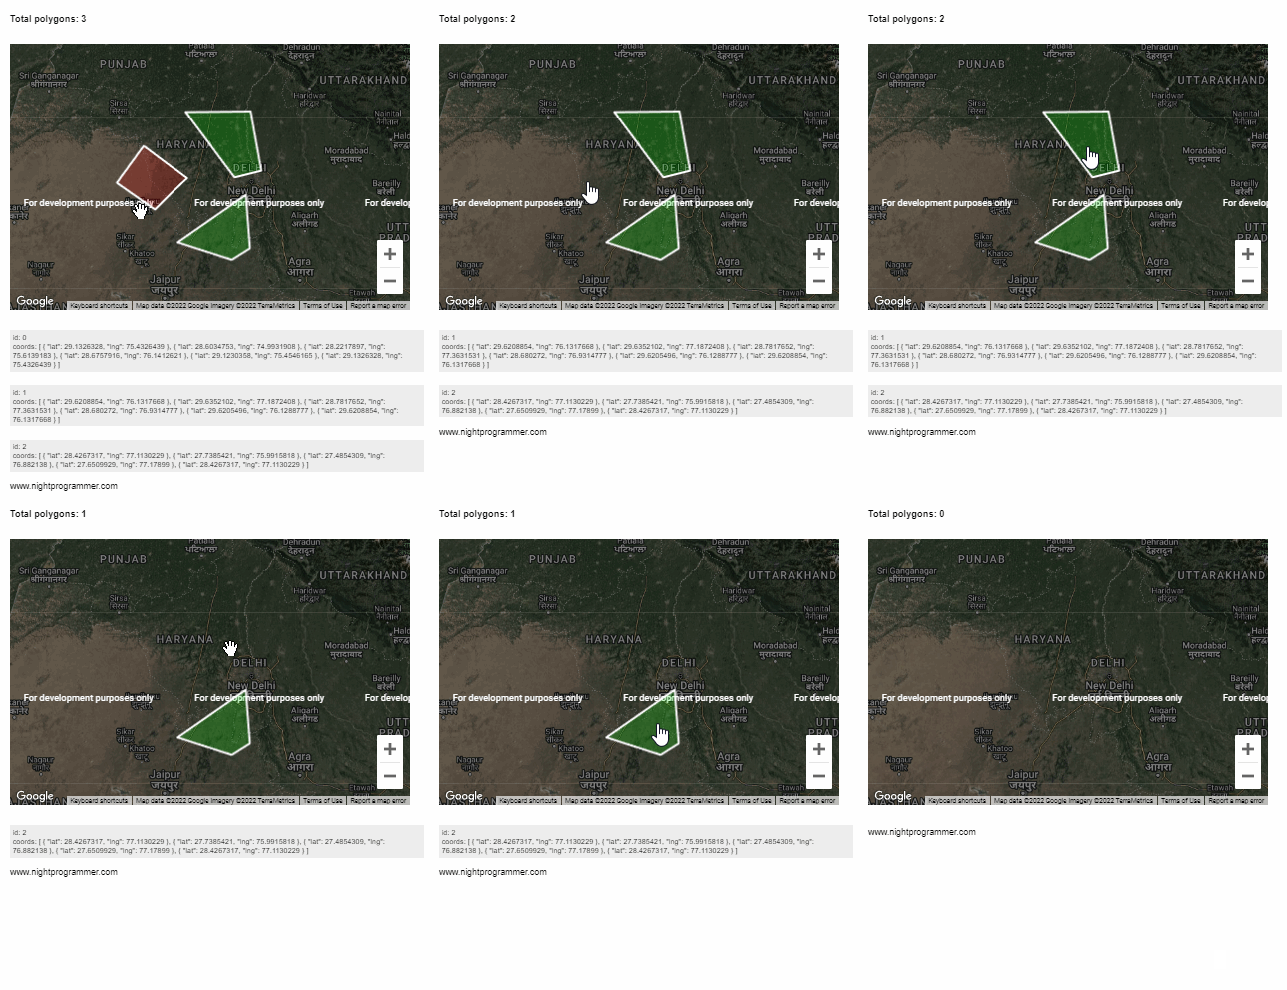
Line 96-103: For each polygon shape, we’ve bound a click event and set the polygon shape to null. We’ve also updated the polygonDataSetMutable state after filtering out the one we just removed.
We can finally use the Polygons component in our App wherever we want. Here’s my App.vue file:
<template>
  <div id="app">
    <Polygons />
  </div>
</template>

<script>
import Polygons from "./components/Polygons";

export default {
  name: "App",
  components: {
    Polygons,
  },
};
</script>

<style>
#app {
  font-family: "Avenir", Helvetica, Arial, sans-serif;
  -webkit-font-smoothing: antialiased;
  -moz-osx-font-smoothing: grayscale;
}

.header-margins {
  margin-left: 40px;
  margin-top: 20px;
}

.map-margins {
  height: 400px;
  width: 600px;
  margin: 30px 40px;
}

.np-polygon-length {
  font-size: 14px;
  font-weight: bold;
}

.np-polygon-data {
  margin: 1em 0;
  font-size: 11px;
  background: #eee;
  padding: 4px;
}
</style>

Code language: HTML, XML (xml)
Here’s what the above code would look like in action:


